Shadowrocket First Connection Guide
Import your existing details, choose Global Routing, then turn on the connection and verify it with both test results and actual access.
Add Server: Add a server or import a subscription
First identify what information you have. A complete subscription link imports a group of servers; an individual server’s address, port, protocol, and authentication details are used to add it manually. Choose the method that matches your existing information; there is no need to create the same entry twice. Do not enter a service management page URL as a subscription link, and do not infer the protocol from the appearance of an address.
For an existing subscription link: select Subscribe
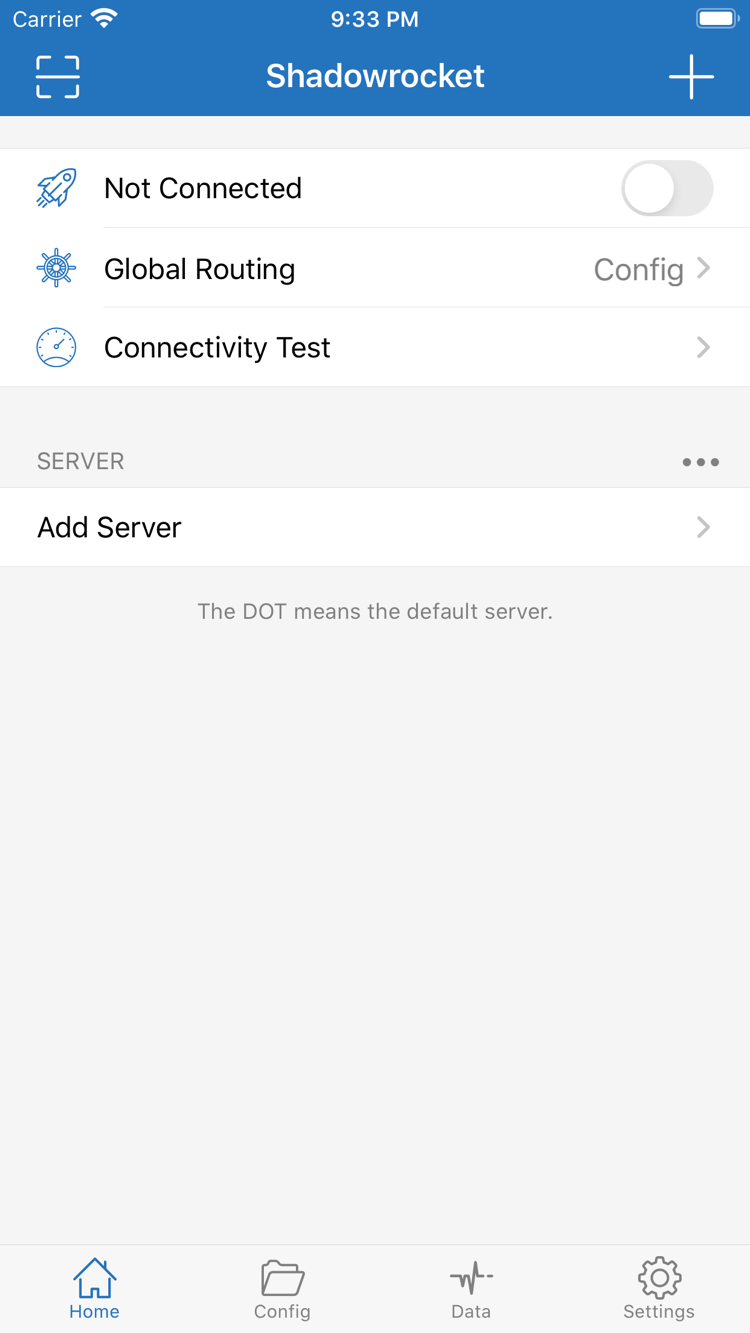
Open Home in Shadowrocket, find Add Server near the SERVER group, and open it. In Add Server, tap Type, select Subscribe, and enter the complete subscription link in the corresponding URL field. If there is a notes field, use a name that helps you identify it. Check for extra spaces, line breaks, or missing query parameters, then use the save action in the upper-right corner to return to Home.
After the subscription content loads, check whether selectable servers appear under SERVER. Saving a subscription entry does not mean its content was successfully retrieved. If you see the subscription name but no servers, first check whether it is still loading; if necessary, use the update action for that subscription entry. If an error appears, keep the exact error text and follow the “Import failure” steps at the end of this guide. Do not try to fix it by repeatedly adding the same link.
For individual server details: fill in the fields for its Type
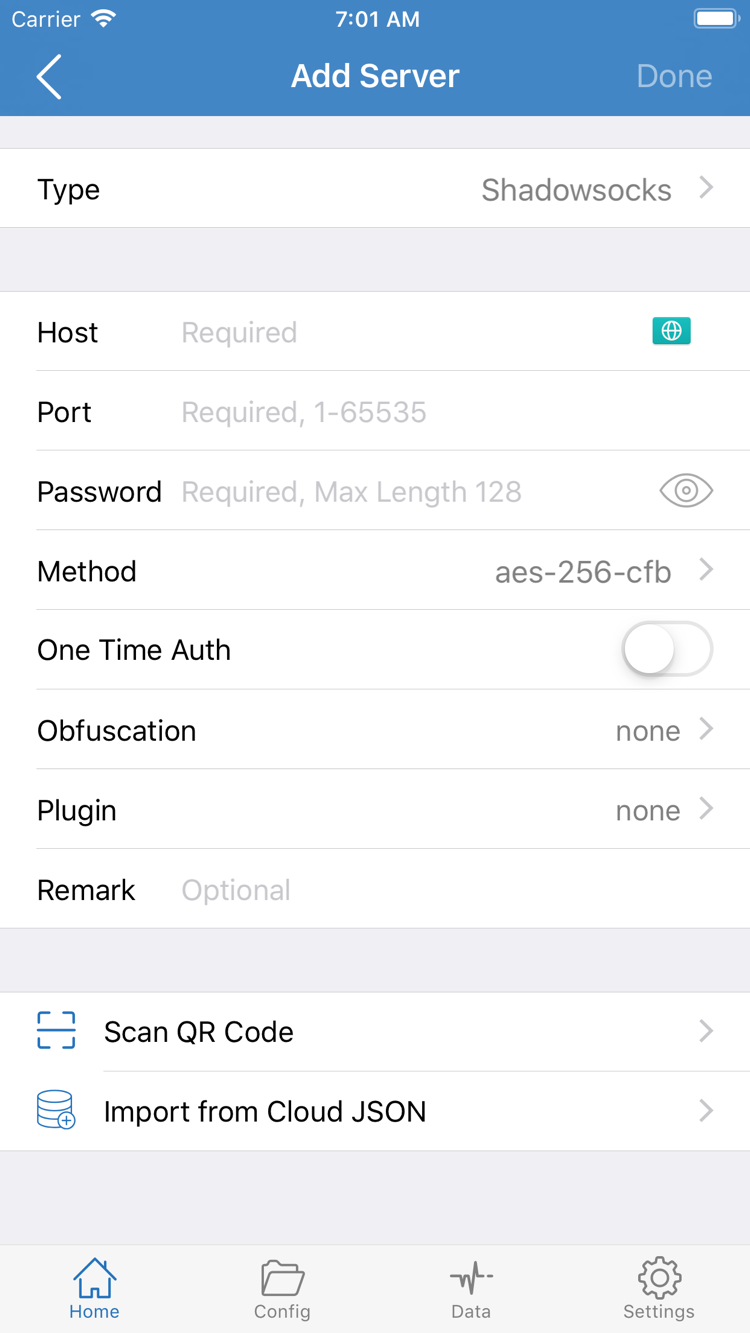
Open Add Server in the same way, select the correct Type, and review the fields shown for that type. The official screenshot shows Host, Port, Password, and Method; fields vary between Types. Enter details exactly as provided for the server. Use Host for the server address and Port for the port number. Authentication values and options such as Method must match; do not transfer parameters from one protocol to another.
If your details are in a QR code, you can use Scan QR Code and grant camera access when prompted by the system. When importing from your photo library, select only an image containing your own valid configuration. Import from Cloud JSON is for existing data in the corresponding format, not for importing arbitrary web content. Do not share an image or complete link publicly if it contains a password or access credentials.
Completion check: At least one selectable server appears under SERVER on Home. This does not verify that a connection works. First choose how traffic should be handled, then connect. A subscription and a configuration file are not the same thing; see the glossary for details.
Global Routing: Choose Config, Proxy, or Direct
After importing a server, return to Home and open Global Routing. This setting controls how requests are handled; it does not fill in missing server details. The three modes are Config / Proxy / Direct. Understand the differences before choosing the one that fits your current purpose. This helps avoid assuming that a page should use a proxy just because the connection switch is on.
- Config: Handles requests according to the rules in the active configuration. Different destinations may match PROXY, DIRECT, or REJECT. Use it for everyday traffic when the appropriate rules are in place.
- Proxy: Handles traffic through a proxy and can be used for a brief comparison test to check whether an issue is related to routing in Config. It does not change whether the server itself is available.
- Direct: Does not route traffic through a proxy server. Do not leave this mode selected when testing a proxy server.
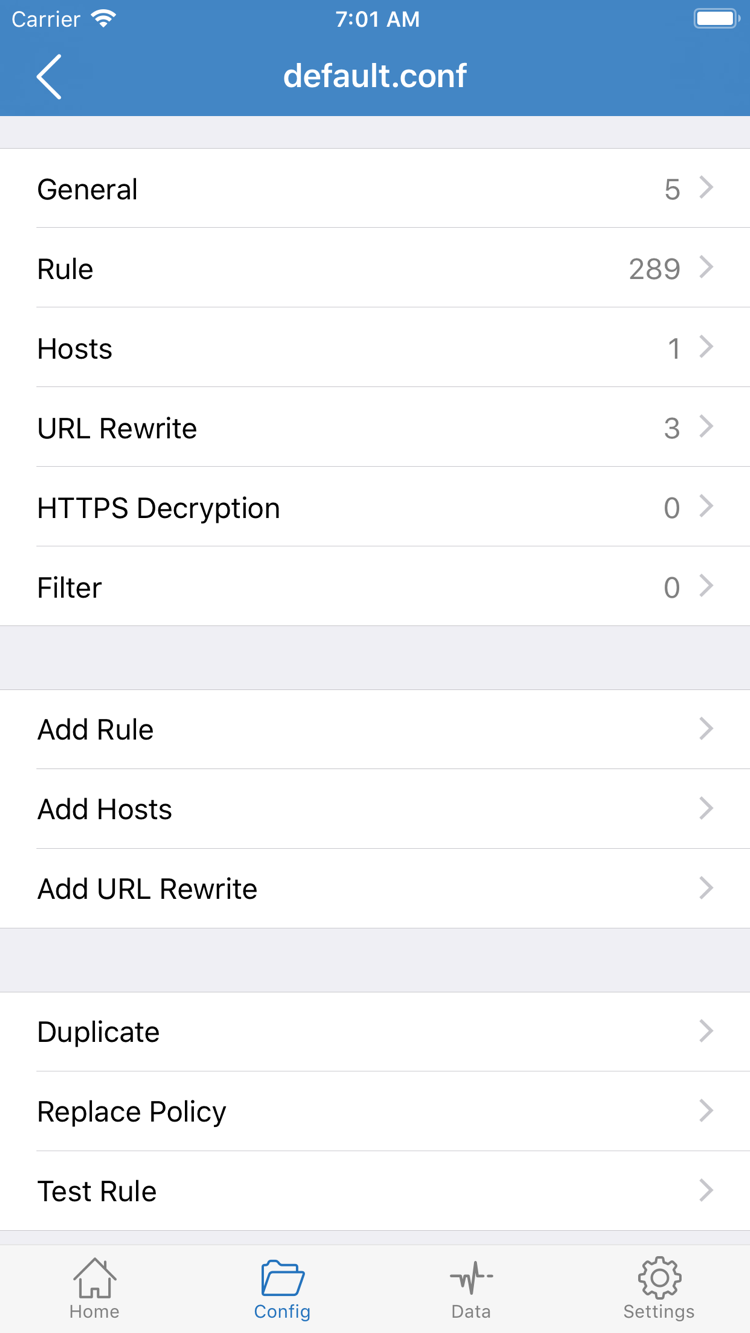
To use rules, first select Config, then open the Config page and confirm that the expected configuration file is active. Open a configuration file to view sections such as General, Rule, and Hosts. The official screenshot on this page shows the configuration editor, not the Global Routing selector on Home. Opening a file for editing does not mean it is active; return to the configuration list to check its selection status.
Rules in Rule are usually matched from top to bottom. Place specific rules appropriately; FINAL sets the policy for requests that do not match earlier rules. PROXY, DIRECT, and REJECT are policies, not server names. For a first connection, avoid changing General, Rule, and DNS at the same time. Start with a configuration whose purpose is known so you have a clear baseline for testing.
If you do not yet have your own rule configuration, you can briefly use Proxy for a server connectivity comparison, then decide whether to switch back to Config. If access works after switching from Config to Proxy, that only indicates a difference in rules, resolution, or routing path. It does not prove that a particular rule is wrong.
Completion check: You know which Global Routing mode is currently selected. If Config is selected, you also know which configuration file is active. For rule keywords, see the glossary; there is no need to build a complete rule set during initial setup.
Home: Select a server and turn on the switch
Return to Home and select the server you intend to use under SERVER. Check that a selected dot or other selection indicator appears. Having a server in the list does not mean it is selected as the default; opening an entry for editing does not select it either. Check the selection status directly in the list on Home, then confirm that Global Routing is still set to the mode chosen in the previous step.
Once confirmed, turn on the connection switch at the top of Home. The first time you connect, the system may ask to add a VPN configuration. Verify that Shadowrocket initiated the request, understand that the permission is used to establish a system network tunnel, then follow the device prompts to confirm and authenticate. If you cancel, the app cannot establish the tunnel. On organization-managed devices, management policies may restrict this permission; first confirm that adding the configuration is allowed.
After granting permission, stay on Home and check whether the status at the top changes from Not Connected. Allow time for the connection process to finish. Do not toggle the switch rapidly while the status is still settling; doing so can combine multiple start and stop attempts and make troubleshooting harder. If the switch turns off immediately or the connection does not complete, note the message shown instead of changing all settings at once.
A VPN indicator in the system means the system network tunnel has been established. It does not mean every request uses a proxy or that the remote server can successfully forward every request. In particular, requests matching DIRECT under Config still connect directly. Do not judge the proxy based only on access to a page that could already be reached directly.
After connecting, keep the selected server and Global Routing unchanged for now. Do not immediately switch between Wi-Fi, cellular data, or another server. Stable conditions help associate the next Connectivity Test result with this connection. If you need to change servers, change only one at a time, confirm its selection indicator, and test again.
Completion check: The selected server is clear, system permission has been granted, and Home shows a connected status at the top. Verify the connection in the next step; an enabled switch is not the end of the setup process.
Connectivity Test: Verify the connection and actual access
Tap Connectivity Test on Home, wait for the test to finish, and review the result shown. The test provides a repeatable connectivity signal; it is not a full bandwidth measurement and does not guarantee that every website or app request will succeed. Do not treat a single result as a long-term performance assessment, or repeatedly change settings to pursue a lower number.
After the in-app test, switch to a browser or the app you intend to use, open the page you need, and refresh it once. An existing page may be cached, so seeing it does not necessarily mean a new network request just succeeded. You can open another item on the same site to check whether a new request completes. This guide does not specify an external test website or ask you to submit an account or credentials for verification.
Check three things together: whether the Home connection status remains active, whether Connectivity Test completes, and whether the intended destination is accessible. If all three meet expectations, keep the current settings. If the test succeeds but a page fails, first determine whether the issue affects one destination or several, then check the Config match and DNS. Do not immediately delete every server or reinstall the app.
For a comparison, note the current configuration, briefly change Global Routing from Config to Proxy, and repeat the same request. If the results differ between modes, focus on routing rules and related resolution paths. If both fail, continue by checking server details and the local network. After testing, restore the mode you normally need so a temporary test setting is not left in place.
If you want to compare Wi-Fi with cellular data, keep the server and Global Routing unchanged, wait for the network switch to complete, and then test again. A network change can affect resolution and routing paths. This comparison can help identify whether local access is a factor, but it cannot establish that a server will work in every environment.
Completion check: You have checked both the in-app test and actual requests, or clearly recorded what failed and at which stage. A recorded failure is also useful: it gives you a concrete starting point for troubleshooting.
Settings: Troubleshoot by stage
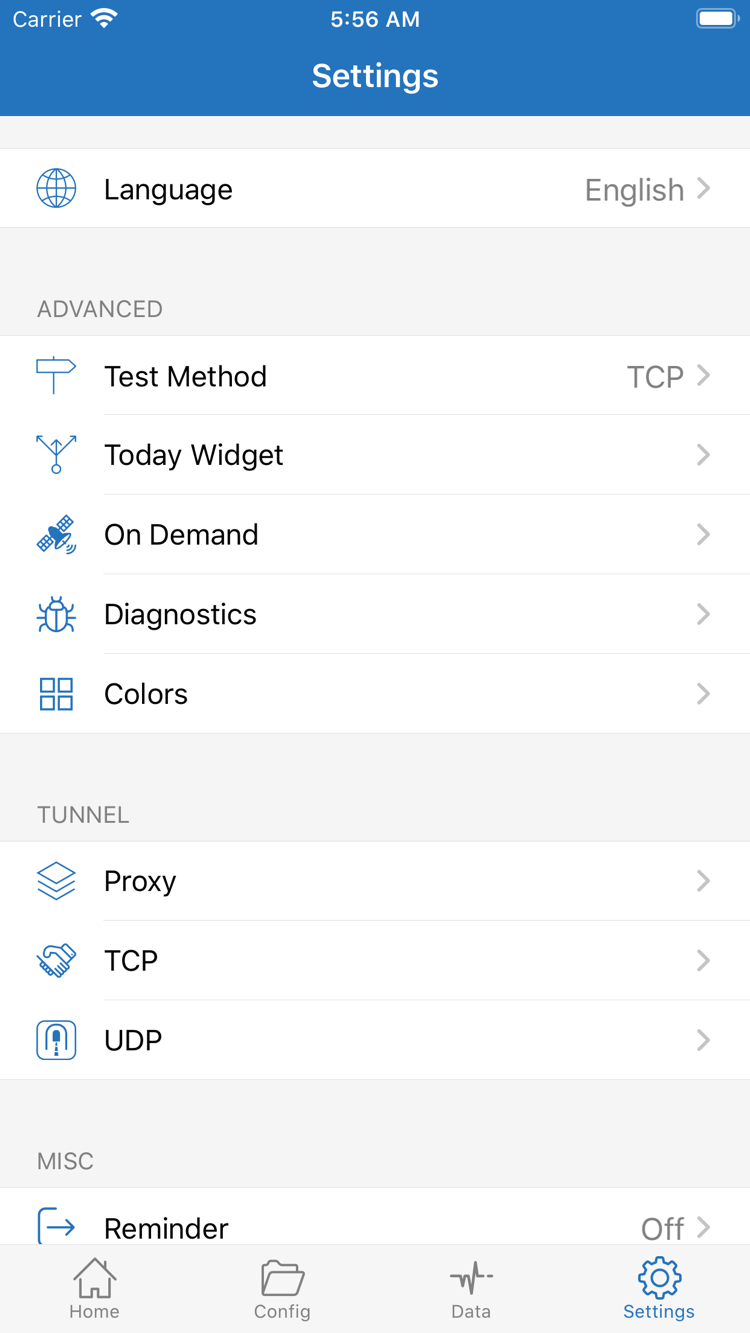
First classify the issue as “cannot import,” “cannot connect,” or “access problems after connecting.” Then check only the items related to that stage. Settings includes Test Method, On Demand, Diagnostics, and settings such as Proxy, TCP, and UDP. These options serve different purposes; they are not all options to enable whenever something fails. Keep defaults or settings known to work, and change only one variable at a time.
Cannot import: Check the input and retrieval process
Return to the first step. Check that the subscription link is in the URL field for Subscribe, that it was copied in full, that no explanatory text was included, and that the local network can complete the request. Check the subscription link’s validity, access restrictions, and content status with the service provider you already use. If the server list is empty, first distinguish a failed subscription update from a response that contains no usable entries. Do not attribute an empty list to Global Routing.
Cannot connect: Check selection and server fields
Check that a server is actually selected on Home, then open that entry and verify Type, Host, Port, and authentication details. Common manual entry mistakes include selecting the wrong protocol type, entering the wrong port, or including a space when copying an authentication value. Confirm that permission for the system VPN configuration has been granted, and check whether another VPN connection is affecting this test. For comparison, pause the other connection before restarting Shadowrocket.
Connected but access fails: Distinguish the test, rules, and network
Check Test Method in Settings and use the same method for before-and-after comparisons; changing the test method changes what the results mean. If you need to investigate further, open Diagnostics and use the tools available for the issue. Diagnostic records may include destination domains, server addresses, or connection details. Hide sensitive information before describing the issue to someone else, and share only the error excerpt needed to identify it.
If Config fails but Proxy works, first check the active file and Rule rather than permanently routing all requests through the same policy. If access recovers only after changing the local network, note the network differences and then check DNS and access conditions. DNS, UDP, or advanced parameters for a particular protocol should be adjusted based on the specific symptoms; enabling an arbitrary setting is not a general fix.
You do not need to enable On Demand during initial testing. It triggers connections under specified conditions; it does not fix incorrect server details. Configure it after the basic connection is verified to make it easier to distinguish automatic triggers from connection failures. For further help, see troubleshooting in the FAQ or the glossary. For store region, purchases, or restoring on a replacement device, see the genuine purchase guide; these are separate from network troubleshooting.
After troubleshooting: Restore the Global Routing mode you need, confirm the default server, run Connectivity Test again, and access the intended destination. Keep a record of settings that worked so you can compare them next time instead of changing the entire configuration from scratch.